
MCP Servers
Publish your components and workflows as Model Context Protocol tools for AI assistants like Claude, Cursor, and Windsurf.
An MCP Server turns the things you build in ByteChef into tools that AI assistants can call. You choose which component actions and which workflows to expose, ByteChef gives you a single Model Context Protocol (MCP) URL, and any MCP-aware client - Claude, Cursor, Windsurf, or your own agent - can discover and invoke them.
A server can expose two kinds of tools:
- Component actions - individual actions from a connected component (for example, "send a Slack message" or "create a HubSpot contact"), optionally backed by one of your connections so the assistant can act as you.
- Workflows - whole workflows from a published project deployment, exposed as a single tool the assistant runs with the inputs you define.
MCP Servers vs. the Management MCP Server. This page is about publishing your own tools to external assistants. If you instead want an assistant to manage ByteChef itself - create and edit projects, workflows, and components - see the Management MCP Server.
The MCP servers you create here need no server-side switch - the per-server endpoint is always mounted. (The separate
BYTECHEF_AI_MCP_SERVER_ENABLED variable gates the Management MCP Server, which is on
by default; setting it to false turns that one off and leaves these unaffected.)
For exposing integrations to your product's own customers instead, see Embedded → MCP Servers.
Create an MCP server
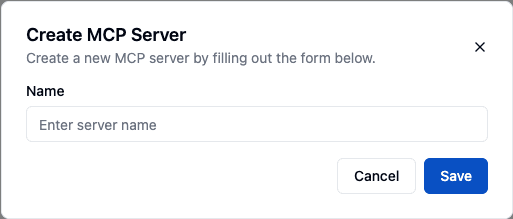
- In the Automation workspace, open MCP Servers from the sidebar.
- Click New MCP Server.
- Give it a name and decide whether to Require authentication (see Authentication below).
A new server is enabled straight away; the Enabled switch sits on the server's row in the list, not in the create dialog. Each server belongs to your workspace and a single environment (Development, Staging, or Production), so you can publish a different set of tools - with different credentials - per environment. Tags are assigned from the server row and let you filter the list as it grows.
A server exposes nothing until you add components or workflows to it.
Expose component actions
- From the server's row menu, choose Add Component.
- Select a component from the available components.
- Select the actions (tools) from that component you want to expose. Only the actions you pick become callable; everything else stays hidden.
- If the actions need authentication, attach one of your connections to the component. The assistant then runs those actions using that connection's credentials.
You can add multiple components to one server, and enable or disable individual tools at any time: each tool row has its own Enabled toggle, and a disabled tool disappears from the server's tool list - connected assistants no longer see or can call it, as if it did not exist. Existing and newly added tools default to enabled. This complements the server-level toggle, which turns the whole server on or off at once.
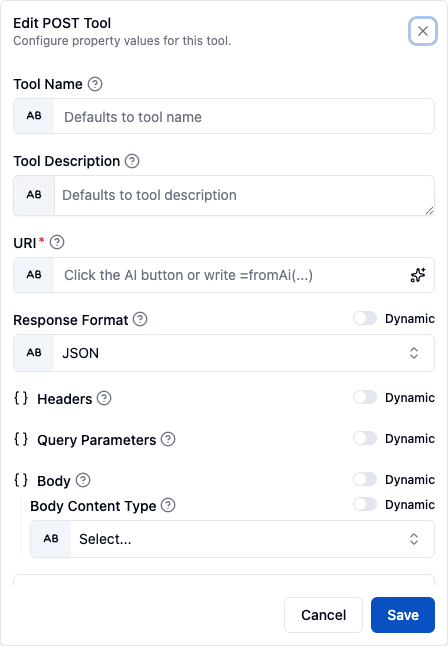
For each exposed action you decide which parameters you fix yourself (a constant the assistant can't change) and which the assistant fills at call time, using the fromAi(...) expression - the same mechanism as attaching tools to an AI Agent. See Supplying tool parameters with fromAi for the syntax.
The same properties control also offers a Tool Name and a Tool Description, both optional and both what the model sees. Left blank, the name falls back to COMPONENT_ACTION in upper snake case - sendChannelMessage on Slack becomes SLACK_SEND_CHANNEL_MESSAGE - and the description falls back to the action's own. A tool name is limited to 64 characters made up of letters, digits, _, -, . and /; anything else, a space included, is rejected as you type.
Rename an action when its generated name would not tell the model what it does in your context, or when two servers should surface the same action differently. The override is stored on the server's attachment to the tool, not on the component, so it does not follow the action anywhere else.
Expose workflows
- From the server's row menu, choose Add Workflows.
- Select a project and a published version.
- Select the workflows from that deployment you want to expose.
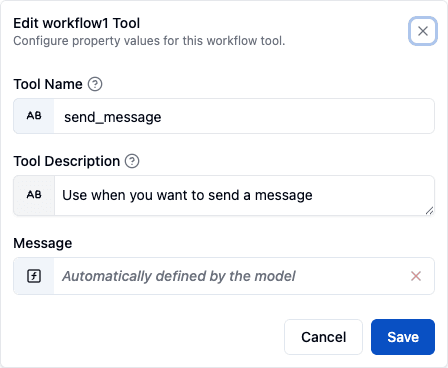
- Complete each workflow's tool mapping, from the properties control on its row in the expanded server. The mapping offers a Tool Name and a Tool Description - both optional, both what the model sees - plus one field per input declared on the workflow's trigger schema. Left blank, the workflow's own name and description are used. A tool name is limited to 64 characters made up of letters, digits,
_,-,.and/; anything else, a space included, is rejected as you type.
Each exposed workflow becomes one tool. Per-input values can be fixed constants or fromAi(...) expressions the assistant fills at call time. When the assistant calls the tool, ByteChef runs the workflow with those inputs and returns the result.
The mapping lives on the MCP server's attachment to the workflow, not in the workflow definition - so the same workflow can be exposed under different tool names on different servers, and adding a workflow does not by itself make it callable.
Why a workflow might not appear in the tool list
A workflow is silently skipped when the server lists its tools if either of two things is true:
- It does not start with the Workflow → New Workflow Call trigger
(
workflow/v1/newWorkflowCall). Only that trigger makes a workflow callable as a tool. - It is not enabled inside its deployment - the per-workflow toggle you set in step 8 of Deploy Project. This is a different switch from the deployment's own enabled state; the deployment-level flag is not consulted here, so a fully enabled deployment can still expose nothing.
A missing tool name is not one of them - the name falls back to the workflow's own name.
Choosing what to expose
Prefer exposing a workflow over pointing an assistant at the upstream API it wraps. The practical differences:
- The assistant is handed a tool, never a credential - authentication stays in the connection attached to the workflow.
- Retry and error handling live in the workflow, so every caller behaves the same way without each client reimplementing them.
- Every tool call runs as an ordinary workflow execution and appears in Workflow Executions with its inputs, outputs, and per-step trace, so a misbehaving assistant is debugged like anything else.
- Changing what a tool does is a publish plus a deployment change, not an update to every connected client.
Get the server URL
Expand the server's row and open its Connect tab. It presents the URL inside ready-to-copy configuration snippets, grouped into per-client tabs - Claude, Cursor, Windsurf, and Other. The URL has the form:
https://<your-host>/api/automation/<secret-key>/mcpKeep this URL private. The secret key identifies this server and selects which tools are exposed. Each snippet has a refresh control that rotates the secret in the URL, invalidating the old one.
The URL alone is not enough to connect - every request must also carry a valid credential (see Authentication below).
Authentication
The URL secret identifies the server. When the server has Require authentication enabled, a separate credential also authenticates the caller, and requests without a valid one are rejected with 401. Whether a credential is required is a per-server setting - see Require authentication below.
Require authentication
Each MCP server has a Require authentication checkbox, in both the create and the edit dialog:
- On - every request must carry a valid API key or OAuth2 token; token-less requests get
401. This is the default for newly created servers. - Off - the URL secret alone is enough; requests are served without a credential, and any credential that is sent is ignored. Servers created before this setting existed default to off, so they keep working unchanged.
Keep the URL secret private in both modes - it is the server's only protection when authentication is off.
Editing an existing server also offers Enforce tool authorization - expose a component's tools only to callers holding one of the component's required authorities, deny by default. It depends on authentication: an anonymous caller has no identity to authorize, so turning Require authentication off clears and disables it.
API key (default)
Create an API key under Settings → API Keys in the Automation workspace and send it with every request as a Bearer header:
Authorization: Bearer <your-api-key>The connection snippets below include this header. API keys are bound to an environment - the key's environment must match the MCP server's environment. Because the key is bound to your user account, you can revoke a single client by deleting its key without regenerating the server URL or touching other clients.
OAuth2 (optional)
For MCP clients that support OAuth2 - including those that cannot send custom headers, such as claude.ai web integrations - ByteChef can run its own OAuth2 authorization server:
BYTECHEF_OAUTH2_AUTHORIZATION_SERVER_ENABLED=trueOnce enabled, OAuth2-capable clients need no manual credential setup: the client discovers the authorization server, registers itself automatically, and you complete a standard authorization-code + PKCE flow using your existing ByteChef login, followed by a consent screen. API keys keep working alongside OAuth2.
The MCP endpoints can also trust JWTs from your own identity provider - see Environment Variables for the trusted-issuer properties. Statically listed issuers work on any edition; resolving an issuer that is not listed, through per-tenant identity-provider federation, is an Enterprise Edition capability.
Connect an AI assistant
Claude.ai (web)
Requires a Claude Pro subscription. claude.ai integrations cannot send custom headers, so enable OAuth2 on your instance first.
- Go to claude.ai/settings/integrations
- Click Add More
- Paste your MCP server URL and save
Claude Desktop
-
Open Claude Desktop
-
Go to Settings → Developer → Edit Config → Open
claude_desktop_config.json -
Add the following, replacing the URL with yours and
YOUR_API_KEYwith your API key:{ "mcpServers": { "ByteChef": { "command": "npx", "args": [ "-y", "mcp-remote", "https://<your-host>/api/automation/<secret-key>/mcp", "--header", "Authorization: Bearer YOUR_API_KEY" ] } } } -
Save the file, then quit and restart Claude Desktop
How requests are handled
When a client connects, ByteChef authenticates the caller's credential, identifies the server from the secret key in the URL, and returns only the tools that server exposes - the enabled actions and workflows you selected, in that server's environment. Disabling the server, disabling a tool, removing a tool, or regenerating the secret key takes effect immediately for new requests.
How is this guide?
Last updated on