
Users
Organization members - invite people, remove access, and, in Enterprise Edition, assign roles.
Organization membership is managed from Settings → Users. From this page an administrator invites new people by email and removes people who should no longer have access. In Enterprise Edition the same page assigns each account an organization role and changes it later.
Availability
The page is available in both editions and requires the ADMIN authority, so non-admins cannot open it. Listing, inviting and removing users work the same either way. Roles are Enterprise Edition only: Community Edition has a single level of access, so every account is an administrator and the role controls described below are not rendered there.
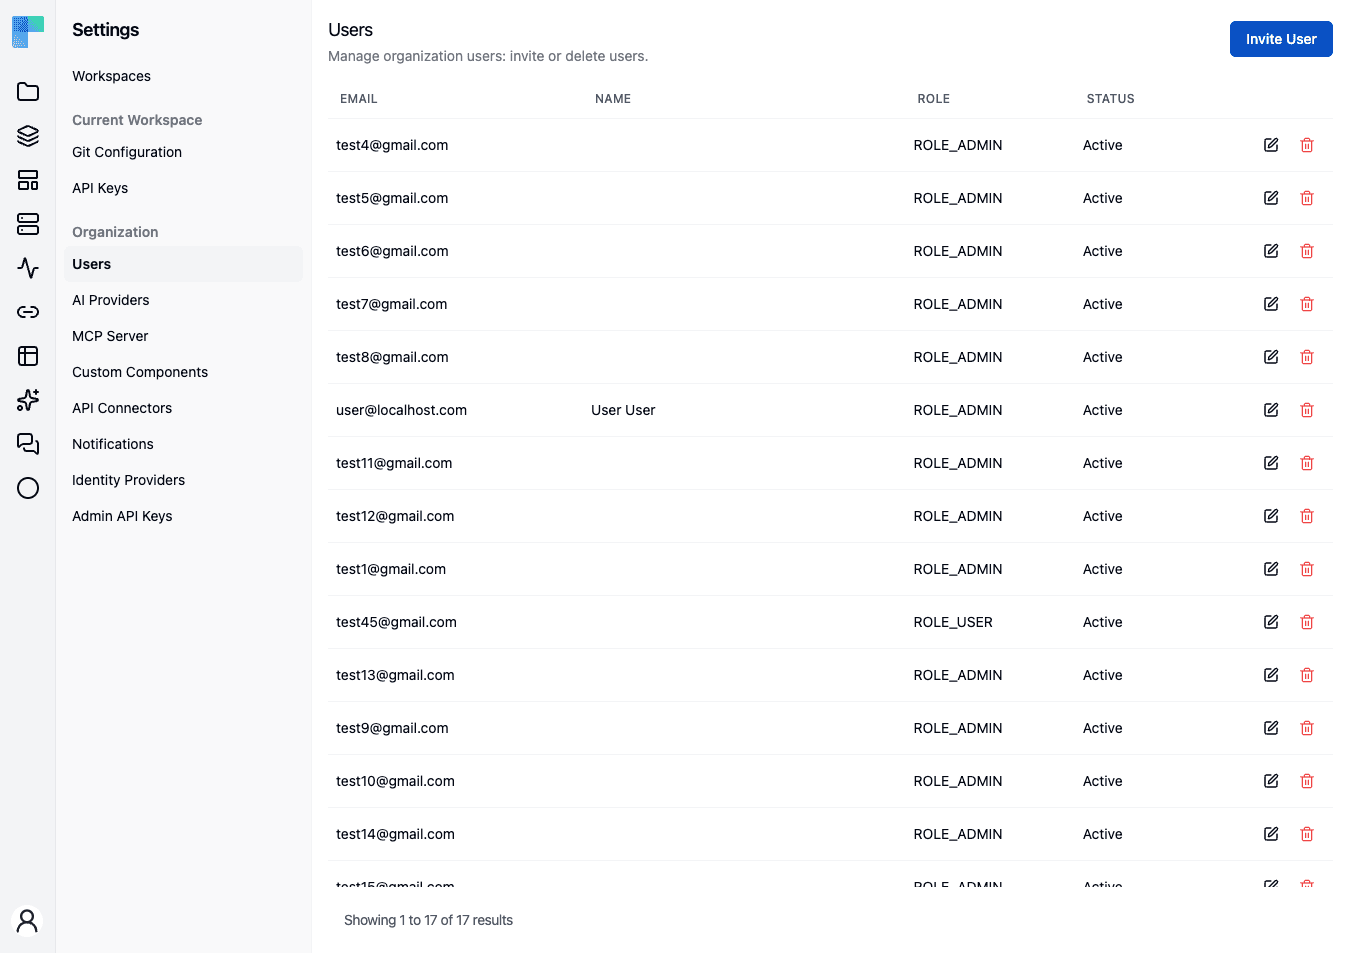
The Users page
The header reads Users, described as "Manage organization users: invite or delete users.", with an Invite User button on the right. Below it, existing users are listed:
| Column | Description |
|---|---|
| The user's email address. | |
| Name | First and last name, when set. |
| Role | The organization authority, shown verbatim - ROLE_ADMIN or ROLE_USER. Every Community Edition account reads ROLE_ADMIN. |
| Status | Active when the account is activated, Pending otherwise. |
| (actions) | Per-row edit (pencil) and delete (trash) buttons. The edit button is Enterprise Edition only - it exists to change a role, and Community Edition has none to change. |
When there are more users than fit on one page, pagination controls appear in the footer. If no users match, the table shows No users found.
Invite a user
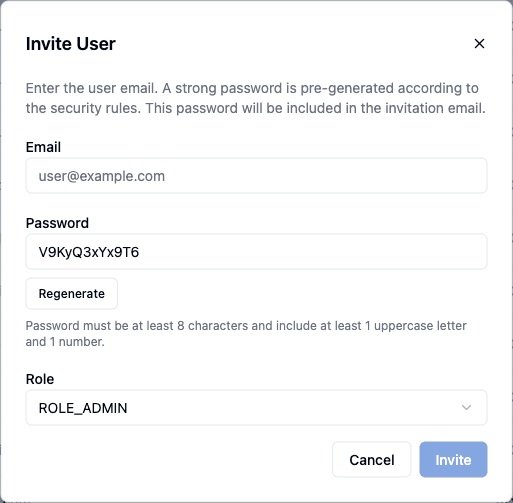
- Click Invite User. The dialog explains: "Enter the user email. A strong password is pre-generated according to the security rules. This password will be included in the invitation email."
- Enter the Email address.
- A Password is generated for you and shown read-only. Regenerate produces a different one. The rule beneath the field states it: "Password must be at least 8 characters and include at least 1 uppercase letter and 1 number."
- Choose a Role. The options come from the organization's configured authorities; the first one is preselected. This step is Enterprise Edition only - Community Edition shows no Role field and invites every account as an administrator.
- Click Invite.
The Invite button stays disabled until an email address is set and the generated password satisfies the password rules; in Enterprise Edition a role must be chosen too. An invalid role is rejected before any account row is created, so a bad request cannot leave an orphaned user behind.
The temporary password travels by email
The generated password is both shown to the administrator and sent to the invitee in the invitation email, alongside an activation link. Treat it as a one-time credential: tell the new user to change it in Profile → Change password once they are in.
The invitation email carries a link to /activate?key=…. Until the invitee follows it the account is not activated, so it shows Pending in the table; following the link flips it to Active. Inviting an email address that already has an account is rejected.
An invited account occupies a seat against the deployment's member quota from the moment the invitation is sent, not from the moment it is claimed.
Change a user's role
Enterprise Edition
Community Edition does not render the edit action. It exists only to change a role, and every Community Edition account is already an administrator.
- Click the edit (pencil) icon on the user's row to open the Edit User dialog, described as "Change the user role."
- The dialog shows the selected User (their email) and a Role dropdown set to their current role.
- Pick a new Role and click Save.
Only the organization role is editable here - email and name are not. Workspace roles are managed separately, per workspace.
Remove a user
Click the delete (trash) icon on the row and confirm. The confirmation warns that the action cannot be undone. Removing a user revokes their access to the organization.
What differs between editions
Community Edition has one level of access. There is nothing to assign, so the controls that would assign it are absent rather than disabled:
| Community Edition | Enterprise Edition | |
|---|---|---|
| List, invite, remove users | Yes | Yes |
| Role field in the invite dialog | Not shown - invites as administrator | Choose from the configured authorities |
| Role column in the table | Always ROLE_ADMIN | The account's authority |
| edit action / Edit User dialog | Not shown | Change the role |
| Workspace roles and permission scopes | Not available | See below |
The workspace role model below - roles, permission scopes and per-workspace membership - is Enterprise Edition throughout, and each section carries the badge.
Roles and permissions
Enterprise EditionComing soon
Role-based access control is on the upcoming release track and is not yet available in the latest released version of ByteChef.
ByteChef separates two things that are easy to confuse:
- The organization role (
ROLE_ADMIN/ROLE_USER) - the authority assigned on this page. It governs the administrative surfaces: Settings pages, user management, licensing. - The workspace role - assigned per workspace, and what governs day-to-day work on projects, workflows, connections, and data.
Permissions are scoped to workspaces. There are no per-project roles and no per-resource ACLs: a user can be an admin in one workspace, an editor in another, and have no access at all to a third.
The built-in workspace roles
Enterprise Edition| Role | Rank |
|---|---|
| Admin | Most privileged. |
| Editor | Everything Viewer has, plus create/edit/delete. |
| Viewer | Read-only. |
The roles are ranked rather than enumerated: a role is granted every permission scope whose declared minimum role it is at least as privileged as, so VIEWER ⊆ EDITOR ⊆ ADMIN holds by construction. Adding a scope means declaring its minimum role once, not editing three role definitions.
Permission scopes
Enterprise EditionScopes are contributed per module at startup rather than listed in a central enum. The built-in set and its minimum role:
| Scope | Minimum role |
|---|---|
WORKSPACE_VIEW | Viewer |
WORKSPACE_MANAGE, WORKSPACE_MEMBER_MANAGE | Admin |
PROJECT_CREATE | Editor |
PROJECT_SETTINGS, PROJECT_DELETE | Admin |
WORKFLOW_VIEW | Viewer |
WORKFLOW_CREATE, WORKFLOW_EDIT, WORKFLOW_DELETE | Editor |
DEPLOYMENT_VIEW | Viewer |
DEPLOYMENT_PUSH, DEPLOYMENT_PULL, DEPLOYMENT_EDIT | Editor |
EXECUTION_VIEW | Viewer |
EXECUTION_DELETE | Editor |
CONNECTION_VIEW | Viewer |
CONNECTION_EDIT, CONNECTION_DELETE, CONNECTION_USE | Editor |
DATA_TABLE_VIEW, KNOWLEDGE_BASE_VIEW, MCP_VIEW, API_KEY_VIEW, AI_GATEWAY_VIEW | Viewer |
DATA_TABLE_CREATE, DATA_TABLE_EDIT | Editor |
KNOWLEDGE_BASE_CREATE, KNOWLEDGE_BASE_EDIT | Editor |
MCP_CREATE, MCP_EDIT | Editor |
API_KEY_CREATE, API_KEY_DELETE | Editor |
Declaring the same scope name with two different minimum roles fails the application at startup rather than silently picking one.
Managing workspace membership
Enterprise EditionWorkspace membership has two surfaces. The current workspace's members are managed on its own page, Settings → Current Workspace → Users. To reach another workspace's members without switching to it, use Settings → Workspaces: each workspace row's ⋮ menu has a Members entry that opens the Workspace Members dialog. The dialog lists members with User, Role, and Added columns. An admin changes a member's role inline through the Role dropdown, removes a member with the trash action, and adds one through the Add user row - search by email, pick a role, confirm. The role dropdown is derived from the server-side role enum, so a role added server-side appears without a client change.
Only a workspace Admin sees the role dropdown, the remove action, and the add row; everyone else sees the membership list read-only. Removing a user at the workspace level revokes their access to every project in that workspace at once.
Federated identity
Enterprise EditionIf you federate authentication through an external identity provider, group claims can drive workspace roles automatically. See Identity Providers.
What gets logged
Enterprise EditionMembership and role changes are recorded in the audit log as WORKSPACE_USER_ADDED, WORKSPACE_USER_REMOVED, and WORKSPACE_USER_ROLE_UPDATED; account lifecycle as USER_CREATED, USER_ACTIVATED, USER_PASSWORD_CHANGED, and USER_DELETED.
See also
- Workspace Users - the per-workspace membership view.
- Identity Providers - federating identities instead of inviting local accounts one by one.
How is this guide?
Last updated on